
Top Coquitlam Handyman Tips for Fixing Leaky Bathtub Faucets
Struggling with a leaky bathtub faucet? Discover essential handyman tips to fix it yourself, save money, and enjoy a drip-free bathroom!
Understanding the Common Causes of Leaky Bathtub Faucets
A leaky bathtub faucet can be a source of both frustration and wasted resources. Understanding the common causes behind this issue is the first step towards fixing it effectively. One of the most prevalent causes is worn-out washers. Over time, the constant pressure and movement within the faucet can cause these rubber or silicone washers to deteriorate, resulting in leaks. When the washers no longer provide a proper seal, water seeps through, leading to that annoying drip.
Another frequent culprit is a damaged valve seat. The valve seat connects the faucet to the spout and can become corroded due to mineral deposits in the water. This corrosion can prevent the faucet from closing properly, causing leaks. Regular maintenance and cleaning can help mitigate this problem, but eventually, the valve seat may need replacement to restore the faucet’s functionality.
A third common cause is issues with the O-rings. O-rings are small, circular rubber seals that help prevent leaks by creating a tight seal between different parts of the faucet. Over time, these O-rings can become brittle, cracked, or dislodged, leading to leaks around the handle or spout. Replacing the O-rings is a relatively simple fix that can often resolve the issue promptly.
Essential Tools and Materials for Faucet Repair
Before you embark on your faucet repair journey, it’s crucial to gather all the necessary tools and materials. Having the right equipment on hand will make the process smoother and more efficient. One of the essential tools you’ll need is a set of screwdrivers. Faucets are often held together by screws, and having both flathead and Phillips screwdrivers will allow you to disassemble and reassemble the faucet components with ease.
Another indispensable tool is an adjustable wrench. Faucet nuts and bolts can vary in size, and an adjustable wrench provides the versatility needed to handle different fittings securely. Additionally, a set of pliers, particularly needle-nose pliers, can be extremely useful for gripping and manipulating small parts during the repair process.
In terms of materials, you’ll need replacement washers, O-rings, and potentially a new valve seat depending on the cause of the leak. Plumber’s tape, also known as Teflon tape, is another essential material that helps create a watertight seal when reassembling the faucet. Lastly, it’s a good idea to have a small container or tray to keep track of all the screws and small components to prevent any loss during the repair.
Step-by-Step Guide to Fixing a Leaky Faucet
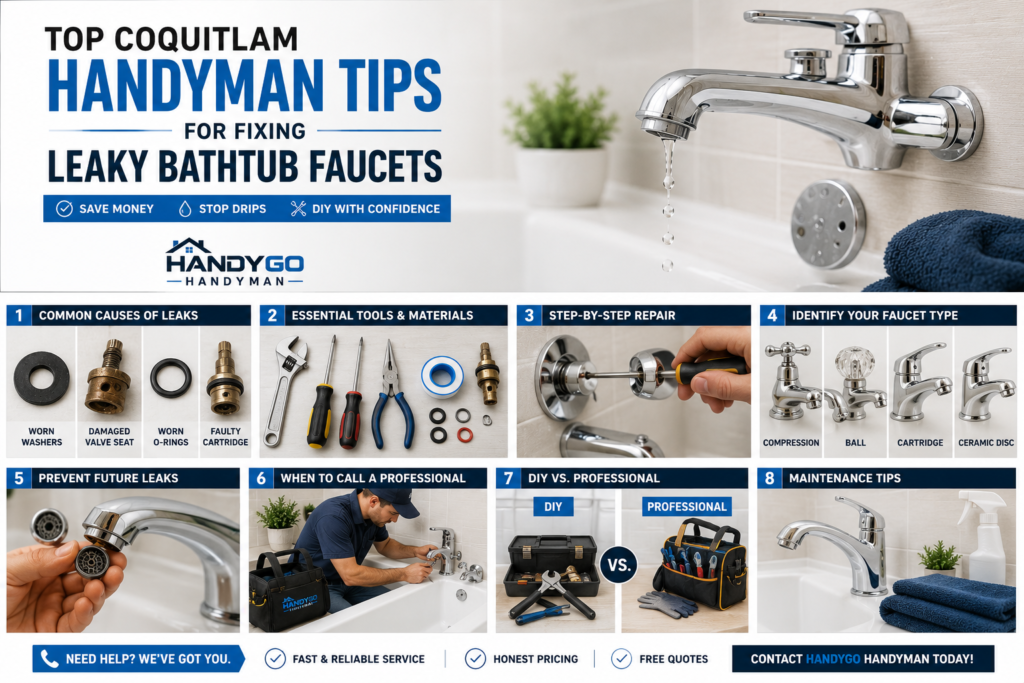
Fixing a leaky bathtub faucet can seem daunting, but with a methodical approach, it becomes manageable. Follow these steps to tackle the repair confidently. First, turn off the water supply to the bathtub. Locate the shut-off valves, typically found under the sink or behind an access panel, and turn them clockwise to stop the flow of water. This step is crucial to prevent any water damage during the repair process.
Next, remove the faucet handle. Use a screwdriver to unscrew the handle and gently pull it off. If the handle is stuck, you may need to use a handle puller tool to avoid damaging the faucet. Once the handle is removed, you’ll have access to the internal components. Examine the cartridge or stem, which is the part that controls the flow of water. Carefully remove the cartridge or stem using pliers or a wrench, and inspect it for signs of wear or damage.
Replace any worn-out washers, O-rings, or the entire cartridge if necessary. Apply plumber’s tape to the threads of the new cartridge or stem to ensure a tight seal. Reassemble the faucet by reversing the disassembly steps, making sure to tighten all screws and nuts securely. Finally, turn the water supply back on and test the faucet for leaks. If the leak persists, recheck the components to ensure they are properly seated and sealed.
How to Identify the Type of Faucet You Have
Identifying the type of faucet you have is crucial for selecting the right replacement parts and following the correct repair procedures. There are four main types of faucets: compression, ball, cartridge, and disc. Each type has a unique design and requires different repair techniques. Understanding the differences will help you diagnose and fix the leak more effectively.
Compression faucets are the most traditional type and are characterized by separate hot and cold handles. These faucets use rubber washers to control the flow of water. If you have a compression faucet, you’ll likely need to replace the washers to fix the leak. Look for signs of wear or damage on the washers and replace them with new ones of the same size and type.
Ball faucets have a single handle that controls both the temperature and flow of water. They use a ball valve and a series of O-rings and springs to regulate water flow. To repair a ball faucet, you’ll need a ball faucet repair kit that includes replacement O-rings, springs, and other components. Follow the instructions included in the kit to disassemble and reassemble the faucet correctly.
Cartridge faucets also have a single handle but use a cartridge to control water flow. These faucets are easier to repair as they typically require replacing the cartridge. Identify the type of cartridge your faucet uses and purchase a compatible replacement. Disc faucets are the most modern type and use a pair of ceramic discs to control water flow. These faucets are less prone to leaks, but if a leak occurs, it usually requires replacing the entire disc assembly.
Tips for Preventing Future Leaks
Preventing future leaks involves regular maintenance and adopting some best practices to keep your faucets in good condition. One of the most effective preventative measures is to address minor leaks promptly. Even a small drip can escalate into a more significant issue if left unaddressed. Regularly check your faucets for signs of wear, such as a loose handle or reduced water flow, and take action immediately.
Another important tip is to avoid over-tightening the faucet handles. Excessive force can damage the internal components and cause leaks. When turning off the faucet, apply just enough pressure to stop the water flow without straining the handle. This practice will extend the life of the washers and other internal parts, reducing the likelihood of leaks.
Water quality also plays a significant role in the longevity of your faucets. Hard water, which contains high levels of minerals like calcium and magnesium, can cause buildup and corrosion within the faucet. Installing a water softener can help reduce mineral deposits and extend the life of your plumbing fixtures. Additionally, regularly cleaning the aerator, the small screen at the end of the faucet spout, can prevent clogs and maintain smooth water flow.
When to Call a Professional Handyman
While many faucet repairs can be handled by homeowners, there are situations where calling a professional handyman is the best course of action. If you’ve attempted to fix the leak but it persists, it may indicate a more complex issue that requires expert intervention. Professional handymen have the experience and specialized tools needed to diagnose and resolve plumbing problems effectively.
Another scenario where professional help is warranted is when the faucet components are severely corroded or damaged. In such cases, attempting a DIY repair can lead to further damage and potential water leaks. A professional handyman can assess the extent of the damage and recommend the most appropriate solution, whether it’s a repair or a complete replacement of the faucet.
Additionally, if you’re not confident in your plumbing skills or lack the necessary tools, it’s wise to seek professional assistance. Plumbing repairs can be intricate, and mistakes can result in costly water damage. A professional handyman can ensure the repair is done correctly and efficiently, giving you peace of mind and saving you time and effort.
Cost Considerations for Faucet Repairs
Understanding the cost considerations for faucet repairs can help you budget effectively and make informed decisions. The cost of repairing a leaky faucet can vary depending on the extent of the damage, the type of faucet, and whether you choose to do it yourself or hire a professional. For a DIY repair, the main expenses will be the cost of replacement parts and any necessary tools you don’t already have.
Replacement parts, such as washers, O-rings, and cartridges, are relatively inexpensive. A basic repair kit can cost anywhere from $10 to $30, depending on the brand and the type of faucet. If you need to purchase additional tools like a handle puller or a wrench, this can add to the overall cost. However, these tools are often reusable and can be a worthwhile investment for future repairs.
Hiring a professional handyman will incur higher costs due to labor fees. On average, you can expect to pay between $50 and $150 for a faucet repair, depending on the complexity of the job and the hourly rate of the handyman. While this is a higher upfront cost, it ensures the repair is done correctly and can prevent more expensive issues down the line. Weighing the cost of DIY versus professional repair can help you decide the best approach for your situation.
DIY vs. Professional Repairs: Pros and Cons
Deciding between DIY and professional repairs involves weighing the pros and cons of each approach. DIY repairs offer several advantages, primarily cost savings. By handling the repair yourself, you can avoid labor fees and only pay for the necessary parts and tools. Additionally, DIY repairs provide a sense of satisfaction and empowerment, as you can take pride in resolving the issue on your own.
However, DIY repairs also come with potential downsides. If you’re not experienced with plumbing, there’s a risk of making mistakes that could worsen the problem. Misdiagnosing the issue or improperly installing components can lead to more significant leaks and water damage. Additionally, DIY repairs can be time-consuming, especially if you need to research the repair process and gather the necessary tools and materials.
On the other hand, professional repairs offer the benefit of expertise and efficiency. A skilled handyman can quickly diagnose the issue and implement the correct solution, minimizing the risk of errors. Professional repairs also come with a level of assurance, as many handymen offer warranties on their work. However, the main drawback is the higher cost due to labor fees. Ultimately, the decision between DIY and professional repairs depends on your confidence in your skills, the complexity of the issue, and your budget.
Maintenance Tips for Bathtub Faucets
Proper maintenance is key to extending the life of your bathtub faucets and preventing leaks. One of the most important maintenance tasks is regular cleaning. Use a mild soap and water solution to clean the faucet handles, spout, and other components. Avoid using abrasive cleaners or scrubbers that can damage the finish and cause scratches. Keeping the faucet clean helps prevent mineral buildup and corrosion.
Another crucial maintenance tip is to periodically inspect the faucet for signs of wear and tear. Check for loose handles, reduced water flow, or unusual noises when turning the faucet on or off. Addressing these issues early can prevent more significant problems down the line. Tighten any loose screws or nuts, and replace worn-out washers or O-rings as needed.
Additionally, consider installing a water softener if you have hard water. Hard water can cause mineral deposits to accumulate within the faucet, leading to clogs and corrosion. A water softener helps reduce these deposits, extending the life of your plumbing fixtures. Regularly cleaning the aerator can also prevent clogs and maintain smooth water flow. By following these maintenance tips, you can keep your bathtub faucet in excellent condition and minimize the risk of leaks.
Conclusion and Additional Resources for Homeowners
Fixing a leaky bathtub faucet doesn’t have to be a daunting task. By understanding the common causes of leaks, gathering the necessary tools and materials, and following a step-by-step repair guide, you can tackle the issue with confidence. Additionally, knowing when to call a professional handyman and considering the cost implications can help you make informed decisions about your repair approach.
Preventing future leaks involves regular maintenance, including cleaning the faucet, inspecting for wear and tear, and addressing minor issues promptly. By adopting these best practices, you can extend the life of your bathtub faucet and enjoy a drip-free bathroom.
For homeowners looking to expand their DIY skills, there are numerous resources available. Online tutorials, how-to videos, and home improvement forums can provide valuable guidance and support. Additionally, many hardware stores offer workshops and classes on basic plumbing repairs. Investing time in learning these skills can save you money and empower you to tackle other home improvement projects with confidence.
By taking a proactive approach to faucet maintenance and repair, you can ensure your bathroom remains functional and efficient. Whether you choose to handle the repair yourself or seek professional assistance, understanding the process and being prepared will lead to successful outcomes. Enjoy the satisfaction of a well-maintained home and the peace of mind that comes with a leak-free bathtub faucet.
